Sphinx, Travis-CI, Github Pages. Full integration for auto docs publishing.
A blog post on how to automate Sphinx documentation deployment to Github Pages via Travis-CI.
Please note this does not cover how to work with Sphinx, how to write your documentation, how to use travis-ci.com website, how to program, etc — this is just a blog post of something I had to figure out for a personal project that might be of help for someone on the internet.
I did this for a project of mine called httpsuite and it worked extremely well — so well, in matter fact, that I’ll likely be no longer using ReadTheDocs for future projects. To put it simply what we will be doing is having Travis-CI automatically build our Sphinx documentation and publish it to our gh-pages branch, which in turn automatically generate our repo’s Github page:

Once the build docs is published into the gh-pages branch Github automatically creates the pages URL. So notice:
- Repo URL: https://github.com/synchronizing/httpsuite
- Github Pages URL (docs): https://synchronizing.github.io/httpsuite/

Sphinx
Set up your Sphinx documentation in your Python project following the Sphinx documentation here. You should end up with a project structure that looks something similar to the following:
.
├── LICENSE
├── README.md
├── dev-requirements.txt
├── docs
│   ├── Makefile
│   ├── make.bat
│   └── source
│       └── ... all documentation files ...
├── examples
├── httpsuite
├── setup.py
└── tests
After testing out Sphinx and making sure it’s working locally, we can set up our .travis.yml file.
Travis-CI
For my purposes I have the following built into my configurations:
pytestintegration for autotesting.coverallsintegration for test coverage report.pypiintegration for auto-deployment to PyPi (httpsuite)pagesfor Sphinx to Github pages.
My configuration, in all, looks like the following:
language: python
python:
- '3.7'
- '3.8'
- 3.8-dev
- nightly
install:
- pip install -r dev-requirements.txt
script:
- pytest --cov
- make -C docs/ html
- touch docs/build/html/.nojekyll
after_success:
- coverage run --source=httpsuite -m pytest tests/
- coveralls
deploy:
  - provider: pypi
    user: "__token__"
    password: $PYPI_TOKEN
    skip_existing: true
  - provider: pages:git
    verbose: true
    token: $GITHUB_TOKEN
    edge: true
    local_dir: ./docs/build/html/
    keep_history: true
However, the only thing that we will be concentrated on is the Github page integration. So let us begin.
Generate Github token, and give Travis access
On Github go to Settings, Developer Settings, Personal access token, Generate new token.

Generate a new token with whatever name you would like (I usually do [service] project's name ) and with the following settings:
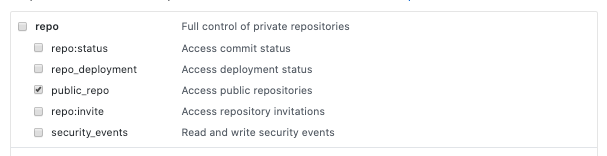

Everything else leave it off. You should be greeted with your new generated token, which you will copy and head over to your projects’ Travis CI settings panel. There, scroll down to “Environment Variable” and add your Github token to a new variable called GITHUB_TOKEN :
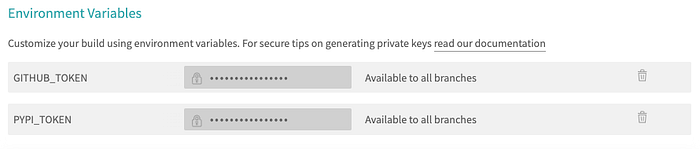
That’s step one done. We’ve given Travis-CI the capability to read and write to our Github repo.
Setup Deployment
The next step is simply setting up our deployment. In your project’s .travis.yml you want to do the following:
- Build the docs.
- Add
.nojekyllfile inside your docsdocs/build/htmlfolder (this is so Github recognizes it’s dealing with .html files, and not Jekyll). - Push
docs/build/htmlinto thegh-pagesbranch.
This is done like so.
Step 1 & 2: Building the Docs, adding .nojekyll
Notice on the .travis.yml file posted above, under script we have the following:
script:
- pytest --cov
- make -C docs/ html
- touch docs/build/html/.nojekyll
In make -C docs/ html we are making the documentations that is found inside the docs/ folder. Make 's-C flag designates the directory in which the Makefile can be found at. The Travis VM is technically always in the root folder of the project, which is why we use the -C flag as oppose to try to cd into the docs folder.
In touch docs/build/html/.nojekyll we are creating the necessary .nojekyll file in the docs. The final step is now publishing our docs, which live inside of docs/build/html — depending on your Sphinx config, the build documentation for you might live somewhere else. You should be able to generalize these instructions for that.
Step 3: Push your docs to Github Pages
On the .travis.yml file above notice the last deploy settings:
deploy:
  - provider: pypi
    user: "__token__"
    password: $PYPI_TOKEN
    skip_existing: true  - provider: pages:git
    verbose: true
    token: $GITHUB_TOKEN
    edge: true
    local_dir: ./docs/build/html/
    keep_history: true
Specifically under provider: pages:git . This is Travis-CI automatic method to deploy to Github pages without bothering with external .sh scripts. What we are essentially doing each line:
- provider: pages:git.                # Deployment config.
    verbose: true                     # Verbose output.
    token: $GITHUB_TOKEN              # Generate GitHub token.
    edge: true                        # Use new Travis API.
    local_dir: ./docs/build/html/     # Location of build docs.
    keep_history: true                # Create incremental commit.
With these settings you should be good to go. Once you commit to your project the documentation will automatically be built and deployed by Travis into your project’s Github page. Now you may visit the following URL:
https://[GITHUB USERNAME].github.io/[PROJECT NAME]/And you should see your Sphinx documentation in all of its glory.
